Yes, making ice cream without a machine definitely works and can be quite effective if you follow certain techniques. Using methods like freezing in shallow dishes, shaking in bags with ice and salt, or manually stirring works well for small batches. While you might not get the ultra-smooth texture of machine-made ice cream, you can still enjoy creamy, flavorful results. Want to learn the best tips and tricks? Keep going to find out more.
Key Takeaways
- No-machine methods like freezing in shallow dishes or resealable bags can produce edible ice cream, but may have a denser or icier texture.
- Proper use of cold ingredients, frequent stirring, and air incorporation improve texture and creaminess without a machine.
- Manual techniques require more time and effort, with less consistency than traditional churning or machine-made ice cream.
- Achieving smooth, fluffy ice cream involves chilling ingredients thoroughly and periodically stirring or shaking during freezing.
- For ultra-smooth, large batches, a dedicated ice cream machine is generally more effective than no-machine methods.

Amazon Basics Silicone Rectangular Baking Mat, Non-Stick, Reusable, Dishwasher Safe, Food Safe, Heat Resistant, 16.5" x 11.6", Beige/Gray, 2-Pack
- Package Includes: 2 silicone baking mats
- Reusable Design: Food-safe and eco-friendly
- Non-Stick Surface: No oil or sprays needed
As an affiliate, we earn on qualifying purchases.
Understanding the Basics of Homemade Ice Cream

To make homemade ice cream without a machine, it’s important to understand the basic ingredients and how they work together. The main components are cream, milk, sugar, and flavorings. You can customize flavors by adding fruit, chocolate, or extracts, giving you endless options. Flavor customization allows you to create unique recipes suited to your taste. Additionally, ingredient substitutions are simple—you can swap heavy cream for coconut milk or yogurt for a tangy twist. Understanding the basic components helps you craft ice cream tailored to your preferences. Incorporating knowledge about cost-effective production methods can help you optimize your ingredients and process for better results. Utilizing alternative freezing techniques, such as using a freezer-safe bag and manual agitation, can improve texture and reduce the need for specialized equipment. Implementing proper application timing during your process can improve texture and consistency. With the right ingredients and some creativity, you can make a variety of flavors without relying on specialized equipment.
Popular Methods for Making Ice Cream Without a Machine

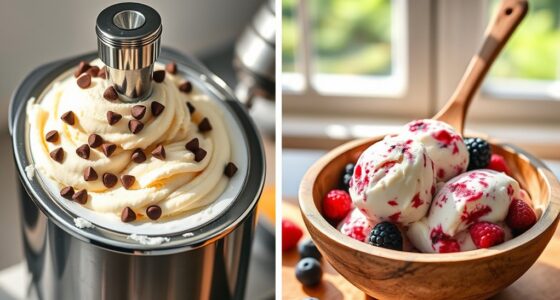
There are several popular methods to make ice cream at home without a machine, each leveraging simple techniques to freeze and churn the mixture manually. One common approach is the “freeze and stir” method, where you freeze the mixture in a shallow dish and stir every 30 minutes until it reaches the desired consistency. You can also use a resealable bag—fill it with the ice cream base, surround it with ice and salt, and shake vigorously. These methods allow for endless flavor variations, from classic vanilla to fruity or chocolate options. To keep your ice cream fresh, store it in an airtight container and let it soften slightly before serving. Proper storage tips help maintain flavor and texture, ensuring your homemade ice cream stays delicious. Using quality ingredients and proper storage can significantly enhance the final product’s taste and consistency. Additionally, using insulating materials during freezing can help achieve a smoother texture more efficiently. Incorporating churning techniques like manual stirring or shaking helps incorporate air and improve creaminess, making the texture comparable to machine-made ice cream. For improved results, some people also use specialized containers designed to facilitate even freezing and better texture.
How Texture and Creaminess Are Achieved in No-Machine Recipes

Achieving a smooth, creamy texture in no-machine ice cream relies on techniques that incorporate air and fat into the mixture. Whisking vigorously or folding ingredients creates air pockets, enhancing creaminess. Adding ingredients like cream, full-fat milk, or yogurt boosts fat content, enriching texture. For flavor variations, using fruit purees or chocolate chips doesn’t compromise creaminess if mixed well. Proper storage techniques also matter—cover your ice cream tightly to prevent ice crystals that ruin smoothness. Temperature plays a role, so periodically stirring during freezing helps maintain consistency. Proper mixing techniques ensure ingredients are evenly distributed, which helps maintain a consistent texture throughout the ice cream. Using the right environmental considerations such as temperature control and stirring during freezing prevent the formation of large ice crystals, contributing to a smoother final product. Additionally, understanding Bitcoin IRA strategies can help diversify your assets and potentially enhance your long-term savings. Incorporating techniques to control ice crystal formation is essential for achieving the ideal texture in homemade ice cream. Here’s a quick overview:
| Technique | Purpose | Tips |
|---|---|---|
| Whisking/Folding | Incorporate air | Do it quickly and thoroughly |
| Fat Addition | Enhance richness | Use cream or full-fat milk |
| Proper Storage | Maintain texture | Cover tightly, avoid ice crystals |
| Temperature Control | Prevent crystallization | Freeze in shallow containers |
| Flavor Variations | Add diverse tastes | Mix ingredients evenly |
Comparing No-Machine Techniques to Traditional Churning

No-machine methods often produce a different texture and creaminess compared to traditional churning, which creates a smoother result. They’re usually easier and more convenient, requiring less equipment and time. Considering these differences, you can choose the technique that best fits your preferences and available tools. Additionally, exploring tuning options like adding mix-ins or adjusting ingredients can help you customize the final texture and flavor to better suit your tastes. Being aware of the end of life planning considerations can also help ensure your recipes and kitchen preparations are well-organized and future-proof.
Texture and Creaminess
While traditional churning produces ice cream with a smooth, uniform texture, no-machine methods often result in a slightly different experience. You might notice a denser or ice-crystal structure, which impacts creaminess. To improve texture, consider:
- Using ingredients like alcohol or corn syrup to inhibit ice crystal formation
- Incorporating flavor variations or ingredient substitutions that affect consistency
- Regularly stirring or scraping during freezing to prevent large ice crystals
- Paying attention to conflict resolution skills during preparation, as patience and gentle handling can influence the final texture.
These adjustments help achieve a creamier, more uniform result. No-machine techniques can deliver satisfying textures, but they often require more attention to ingredients and process. Keep in mind that flavor variations and ingredient substitutions can influence both taste and mouthfeel, so experimenting can help you find your ideal no-machine ice cream texture.
Ease and Convenience
Compared to traditional churning, no-machine ice cream methods generally offer greater convenience and require less specialized equipment. You can make a wide variety of flavor variations using simple ingredients like fruit, chocolate, or nuts, without needing an ice cream maker. These methods often involve freezing and stirring or shaking, which you can do at home with minimal effort. Plus, cleanup is easier since you avoid bulky machinery. When storing your homemade ice cream, use airtight containers and keep it in the freezer, but be aware that no-machine recipes might need extra stirring during storage to prevent ice crystals. Additionally, understanding the effectiveness of ice cream techniques can help you achieve better texture and consistency. Overall, no-machine techniques make ice cream accessible, flexible, and quick, especially if you want to experiment with different flavors without hassle.
Tips for Success: Getting the Best Results Without Equipment

To get the best results, start with cold ingredients to speed up freezing and improve texture. Keep stirring your mixture often during freezing to break up ice crystals and keep it smooth. Gently folding in air will help create a creamier, fluffier ice cream without any special equipment. Using a quality mixing technique can also make a significant difference in achieving the perfect consistency. Additionally, incorporating continuous agitation methods can enhance texture and prevent large ice crystal formation. Maintaining consistent temperature control throughout the process is also key to achieving the best possible results. Regularly monitoring the freezing environment ensures that the mixture stays at an ideal temperature for optimal texture and flavor. Ensuring proper air circulation can help maintain even freezing, contributing to a better overall quality.
Use Cold Ingredients Properly
Using cold ingredients is essential for making smooth, scoopable ice cream without a machine. When your ingredients are already chilled, they freeze faster and more evenly. Start with frozen ingredients whenever possible, like frozen fruit or pre-chilled dairy. Using cold utensils, such as a chilled mixing bowl or spoon, helps maintain the low temperature during preparation. To maximize results, keep these tips in mind:
- Freeze your mixing bowls and tools beforehand to prevent heat transfer.
- Use ingredients straight from the fridge or freezer for a colder base.
- Avoid adding warm liquids, which can prevent proper freezing and lead to iciness.
- Ensuring proper ventilation around your workspace helps maintain consistent cold temperatures and prevent heat from affecting your ingredients.
Stir Frequently During Freezing
Stirring your ice cream mixture frequently during freezing helps break up ice crystals and creates a smoother texture. This mixing technique is essential because it prevents large ice crystals from forming, ensuring creaminess. During the freezing process, which typically lasts about 2-4 hours, you should stir the mixture every 30-45 minutes. Consistent stirring redistributes the cold, promotes even freezing, and incorporates air for a lighter finish. Use a spatula or whisk to scrape down sides and break up any icy pockets. The key is maintaining steady movement to improve texture and reduce freezing time. By sticking to these mixing techniques, you’ll achieve a well-textured homemade ice cream without an ice cream maker, even with varying freezing durations.
Incorporate Air for Creaminess
Incorporating air into your ice cream during freezing helps create a light, fluffy texture that feels indulgent and smooth. This process, known as air incorporation, is key for texture enhancement without equipment. To improve results, gently fold whipped cream or beaten egg whites into your base mixture before freezing. This adds natural air and boosts creaminess.
- Use a whisk or fork to incorporate air manually, creating tiny bubbles for better texture
- Chill your mixture thoroughly before freezing to allow air to distribute evenly
- Periodically stir or shake the mixture during freezing to trap and hold air bubbles
These steps help you achieve a creamy, airy consistency, making your homemade ice cream feel just as luxurious as store-bought.
Limitations and When to Consider Using a Machine

While homemade ice cream without a machine can be fun and cost-effective, it does have its limitations. You might find that the process requires frequent stirring to prevent large ice crystals, which can be time-consuming and less consistent. This highlights machine limitations, as a dedicated ice cream maker can churn the mixture smoothly without constant attention. Additionally, ingredient restrictions come into play—you can’t always incorporate mix-ins or achieve the same texture as machine-made ice cream. The manual method may also struggle to produce a uniformly creamy consistency, especially with larger batches. If you’re aiming for ultra-smooth, well-blended ice cream with minimal effort, using a machine becomes a practical choice. It saves time and ensures better results when precision matters.
Frequently Asked Questions
Can I Customize Flavors Easily With No-Machine Recipes?
You can definitely customize flavors easily with no-machine recipes. This method offers great flavor flexibility, allowing you to experiment with ingredients like fruit purees, chocolate, or nuts. You can also do ingredient substitution to suit your taste or dietary needs. Simply mix your preferred flavors into the base and freeze, stirring occasionally. This hands-on approach makes it simple to create personalized ice cream varieties without special equipment.
How Long Does Homemade Ice Cream Last in the Freezer?
Think of your homemade ice cream as a delicate snowflake—beautiful but easily affected by time. In your freezer, it typically lasts about 1 to 2 months if stored properly. To prevent freezer burn, use airtight storage containers and keep the temperature steady. After that, flavors may fade, and texture can suffer. So, enjoy your frozen treat within this window for the best taste and quality.
Are No-Machine Methods Suitable for Dairy-Free Ice Cream?
Yes, no-machine methods work well for dairy-free ice cream. You can use dairy alternatives like coconut milk, almond milk, or cashew cream to create creamy textures. Just blend your chosen base with flavor combinations like fruit, cocoa, or vanilla, then freeze and stir periodically to prevent ice crystals. This approach allows you to customize flavors easily and enjoy delicious dairy-free ice cream without special equipment.
What Are Common Mistakes That Ruin No-Machine Ice Cream?
Remember when making ice cream was a simple task, like churning butter? Common mistakes can ruin your no-machine ice cream. Overmixing errors lead to a grainy texture, while improper ingredient ratios affect flavor and consistency. To avoid these, gently fold ingredients, measure carefully, and don’t rush the process. Stick to the recipe, and your homemade ice cream will turn out creamy and delicious, no matter the era!
Does No-Machine Ice Cream Require Special Storage Tips?
When storing your no-machine ice cream, follow proper storage tips to keep it fresh. Place it in an airtight container to prevent freezer burn, and label it with the date. For best results, consume within 2-3 weeks to enjoy ideal texture and flavor. Avoid frequent freezer door openings, which can cause temperature fluctuations. Proper storage ensures your homemade ice cream stays delicious and maintains the right consistency during freezer duration.
Conclusion
Sure, you can whip up ice cream without a machine, but don’t expect it to match the silky perfection of the pros. Sure, you’ll get a frozen mess that’s more “experimental” than “delicious,” but hey, who needs that fancy gadget anyway? Just embrace the icy lumps and questionable texture—after all, it’s all about the adventure, right? So go ahead, DIY your way to cold chaos—because real ice cream is overrated.