
To make assembling an ice cream cake easier, line your springform pan with plastic wrap and let your ice cream soften for about 10 minutes. Pack each layer tightly, alternating flavors with chunky add-ins like crushed cookies and hot fudge. Freeze the layers overnight for stability, and for a clean cut, dip your knife in hot water before slicing. These handy tips will guarantee you create a stunning cake with minimal hassle, and there’s so much more to discover!
Key Takeaways
- Soften ice cream for about 10 minutes before layering to ensure easier spreading and a smoother finish.
- Use a springform pan lined with plastic wrap for easy removal and clean assembly.
- Create a crunchy layer by mixing crushed cookies with melted butter, adding texture between ice cream layers.
- Pack each layer tightly to prevent air pockets and ensure stability in the cake structure.
- Dip a sharp knife in hot water before slicing for clean, even portions when serving.
What Makes This Tutorial Great

What makes this tutorial great is how it simplifies the ice cream cake-making process while sparking your creativity.
You’ll find clear, step-by-step instructions to prepare your cake and ice cream layers ahead of time, making it easy to assemble. The use of stabilized whipped cream guarantees your frosting holds its shape and looks fantastic. Additionally, incorporating raw food diets into your meal planning can inspire healthier dessert options. For a refreshing twist, consider adding frozen yogurt pops as a layer for a cool and unique texture. Furthermore, utilizing churned perfection techniques can enhance the creaminess of your ice cream layers.
Clear, step-by-step instructions make assembling your ice cream cake a breeze, while stabilized whipped cream ensures a stunning finish.
Plus, you can customize your ice cream cake with various flavors, textures, and even store-bought options. The tutorial also includes helpful tips, like chilling your tools and working quickly, to prevent melting during assembly. Additionally, incorporating birthday cake ice cream can add a festive touch that enhances both flavor and appearance.
With these essential steps, you can create a delicious, visually appealing ice cream cake that reflects your personal taste and style.
Get ready to impress with your masterpiece!
Ice Cream Cake Ingredients

When creating an ice cream cake, selecting the right ingredients is essential for achieving the best flavor and texture.
Start with high-quality real dairy ice cream; avoid frozen desserts made with vegetable oil fats, as they won’t set well. You’ll typically need 1.5 to 3 quarts of ice cream, with delicious combinations like vanilla ice cream and chocolate.
Create a crunchy layer using crushed cookies mixed with melted butter between your ice cream layers. Don’t forget the hot fudge sauce—whether homemade or store-bought—for richness and to help hold the layers together.
Finally, top it off with a stabilized whipped cream topping for a beautiful finish. Follow these assembly tips for an unforgettable ice cream cake!
Baking the Cake Layers

When you’re baking your cake layers, choosing the right recipe is key for a sturdy base that holds up against the ice cream.
You’ll want to take into account layering techniques that guarantee even distribution and a beautiful finish.
Let’s explore how to get those layers just right for your ice cream cake masterpiece!
Choosing the Right Recipe
How do you guarantee your cake layers are perfect for an ice cream cake? Start by choosing two 8×2 cake pans to make sure they fit snugly during assembly.
Use homemade cake goop as a pan release to prevent sticking, making it easier to remove those delicate cake layers once baked.
After baking, let them cool for about 15 minutes before transferring to a cooling rack; this helps maintain texture and prevents sogginess.
For the best results, wrap the cooled layers tightly and freeze them for at least six hours or overnight.
Don’t forget to experiment with flavors like chocolate, vanilla, or funfetti, creating delightful combinations that pair perfectly with your favorite ice cream.
Layering Techniques for Success
While preparing your cake layers, mastering the layering technique is essential for a stunning ice cream cake. Start by using two 8×2-inch cake pans to guarantee the right thickness. To prevent sticking, apply homemade cake goop before pouring in the batter.
After baking, let the cake layers cool for about 15 minutes, then transfer them to a cooling rack. Once cool, wrap the layers securely in plastic wrap and freeze them for at least 6 hours. This stabilizes them for assembly.
When you’re ready, take the cake from the freezer, layer on top a scoop of chocolate ice cream, and smooth the top with whipped cream frosting. Your ice cream cake will be a masterpiece!
How to Prepare the Ice Cream Layer

Preparing the ice cream layer is an essential step in creating a delicious ice cream cake. Follow these simple tips for a perfect layer:
- Soften the Ice Cream: Let the ice cream sit at room temperature for about 10 minutes. This makes it pliable and easy to spread without melting.
- Line the Cake Pan: Use plastic wrap or aluminum foil to line your cake pan. This helps with easy removal once it’s frozen.
- Smooth and Spread: Use the entire 1.5-quart container of ice cream, spreading it evenly in the pan for a uniform thickness.
- Freeze and Set: Freeze the layer overnight or for at least 6 hours, pressing out any air pockets to guarantee a denser texture for assembly.
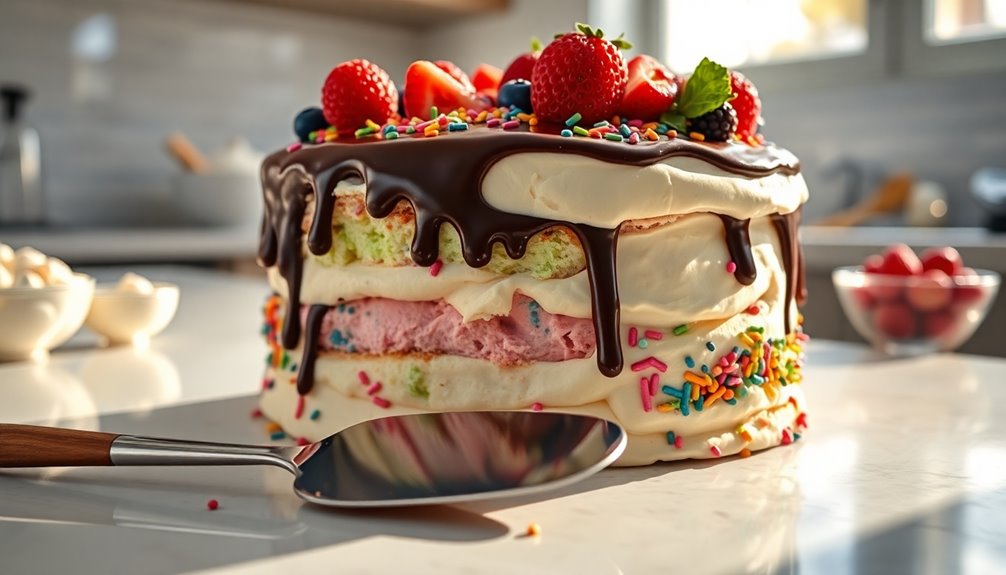
How to Assemble the Ice Cream Cake

After freezing the ice cream layer, it’s time to bring your ice cream cake to life.
First, line your springform pan with plastic wrap or parchment paper for easy removal and clean edges. Allow your softened ice cream to sit for about 10 minutes before you start layering; this will make spreading easier.
Begin assembling the cake by adding a layer of softened ice cream, followed by store-bought hot fudge and crushed cookies. Confirm each layer is packed tightly for stability.
Once you’ve finished layering, freeze the assembled cake for at least 12 hours.
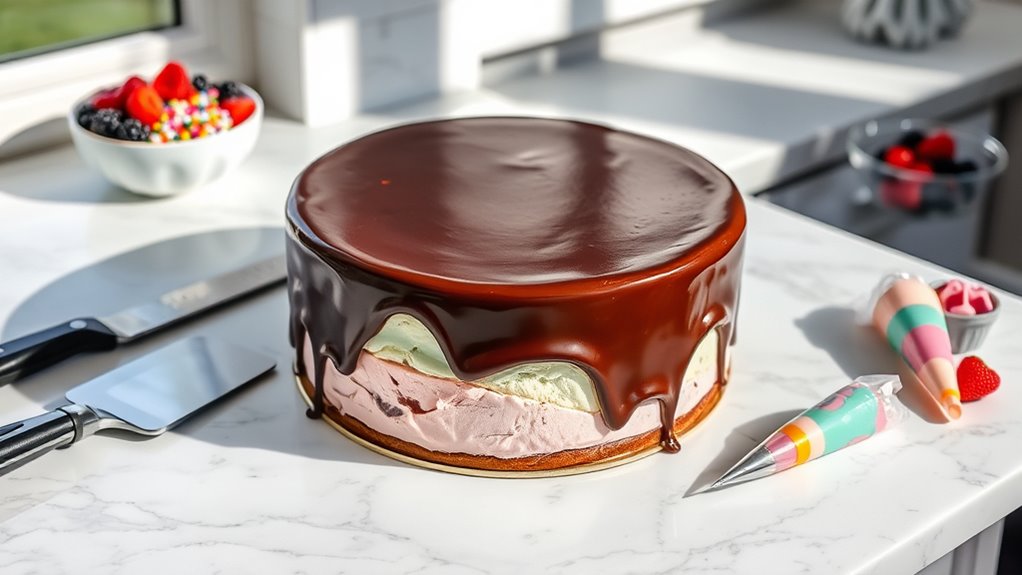
When it’s time to serve, use a hot knife to slice through the cake for clean cuts, making your dessert look as good as it tastes.
More Flavor Ideas

If you’re looking to elevate your ice cream cake game, exploring unique flavor combinations can make all the difference.
Here are some delicious ideas to try:
- Peanut Butter Cup Ice Cream layered with chocolate cake and a drizzle of caramel sauce for a rich treat.
- Strawberry Ice Cream paired with vanilla cake and fresh fruit for a invigorating summer dessert.
- Cookie Dough Ice Cream on a chocolate chip cookie crust creates an indulgent dessert every cookie lover will adore.
- For a s’mores-inspired cake, use toasted marshmallow ice cream, graham cracker crumbs, and a fudge ripple, topped with mini marshmallows and whipped cream for a fun camping vibe.
Get creative and enjoy these delightful combinations!
Tips for Success
To create the perfect ice cream cake, paying attention to a few essential tips can make all the difference in your final product.
First, allow the ice cream to soften slightly for easier layering; this helps it spread smoothly without melting too quickly.
When you whip cream, use a chilled bowl for better volume and a firmer texture that holds its shape.
As you assemble the ice cream, press out air pockets to guarantee a denser structure.
For a smooth finish, run a knife under hot water before slicing, making it easier to cut through the frozen layers.
Finally, allow the assembled cake to freeze for at least 12 hours, guaranteeing all layers are firm and cohesive for a delightful frozen dessert.
Recipe

Creating a delicious ice cream cake can be a fun and rewarding experience, and with this simple recipe, you’ll impress your family and friends.
Follow these steps for a perfect assembly:
- Line your springform pan with parchment paper or plastic wrap for easy cake removal.
- Slightly soften your ice cream for easier layering. Spread a layer in the pan, then add a crunchy layer of crushed Oreo mixed with melted butter.
- Freeze each layer solid before adding the next to maintain distinct flavors.
- Once complete, slice your cake with a hot knife dipped in water for clean, appealing portions.
Top your cake with whipped cream for an extra treat, and enjoy your scrumptious creation! Additionally, remember that the average ice cream consumption per person in the U.S. is about 23 pounds annually, which reflects the popularity of this delightful dessert.
Reader Interactions

What layering techniques do you find work best when building your ice cream cake?
Share your essential freezer prep tips, too!
Let’s swap ideas to create the ultimate dessert experience!
Layering Techniques Explained
Layering an ice cream cake can elevate your dessert game, making it visually stunning and delicious. Here are some effective layering techniques to ponder:
- Soften the Ice Cream: Allow each layer of ice cream to soften for about 10 minutes. This makes spreading easier and creates a smooth finish.
- Crunchy Layer: Mix melted butter with crushed cookies for a stable, crunchy layer that prevents separation.
- Layering Flavors: Alternate layers of different ice cream flavors with hot fudge sauce and crushed cookies, maintaining a balanced ratio of about 1 to 1.5 cups of chunky add-ins per quart of ice cream.
- Clean Cuts: For a clean cut, dip a sharp knife in hot water before slicing through your frozen cake.
Additionally, be mindful that ice cream contains high sugar and fat content, which can lead to health issues if consumed excessively.
These assembly tips will enhance your ice cream cake experience!
Essential Freezer Prep Tips
To guarantee your ice cream cake turns out perfectly, it’s essential to prepare your freezer ahead of time.
First, make certain your freezer has enough room to accommodate the assembled cake. Chill your springform pan for at least an hour to help the layers set effectively.
While you make your layers, let the ice cream sit for about 10 minutes to soften, making it easier to spread. Pre-freeze your serving platter or cake plate for 30 minutes to minimize melting when you place the cake on it.
Once assembled, cover the cake with plastic wrap or aluminum foil, then put it back into the freezer for at least 12 hours to make sure all layers are firm before you remove the cake for serving.
Frequently Asked Questions
How to Put Together an Ice Cream Cake?
To put together an ice cream cake, start by lining your cake pan with plastic wrap or parchment paper.
Let your ice cream soften for about 10 minutes before layering. Alternate between ice cream flavors, crushed cookies, and hot fudge, pressing down each layer to eliminate air pockets. Freeze each layer for at least six hours.
Finally, frost with stabilized whipped cream, ensuring you use chilled tools for the best consistency. Enjoy your creation!
How Long Does an Ice Cream Cake Need to Soften?
An ice cream cake needs about 10-15 minutes to soften at room temperature before you slice it.
This slight softening makes cutting easier and enhances the texture and flavor.
Keep an eye on it, though—if it’s left out too long, it might start melting and mess with the layers.
You want it to yield slightly under gentle pressure but not become overly soft.
A hot knife can help you make cleaner cuts, too!
How to Transport an Ice Cream Cake Without It Melting?
To transport an ice cream cake without it melting, start by freezing it for at least 12 hours.
Use a cooler packed with ice packs or dry ice to keep it cold during your journey.
Place the cake on a sturdy surface, like a cutting board, to prevent any shifting.
Cover it with plastic wrap or aluminum foil to protect it from temperature fluctuations.
If you can, transport it in an air-conditioned vehicle for added assurance.
How Long Should I Let Ice Cream Cake Thaw?
You should let your ice cream cake thaw in the refrigerator for about 30 minutes to 1 hour before serving.
This way, it softens slightly, making slicing easier. If you’re short on time, leaving it at room temperature for 10 to 15 minutes can work, but keep an eye on it to avoid melting.
Just remember not to thaw it too long to maintain its shape and texture for a perfect presentation!
Conclusion
So there you have it, folks! With these ice cream cake hacks, you can create a masterpiece worthy of a bakery—or at least your Instagram feed. Who needs culinary school when you’ve got a freezer and a sprinkle of creativity? Just remember, if your cake collapses, it’s just an abstract dessert sculpture waiting for its moment of fame. After all, in the world of baking, perfection is overrated; it’s the effort (and the ice cream) that truly counts!