
To make homemade rolled ice cream, you’ll need a cold, flat metal surface that’s been pre-frozen for several hours, along with simple tools like spatulas and small scoops. Pour your ice cream mixture onto the chilled surface, then quickly spread it into a thin layer before freezing it further. Once solid, use your spatula to roll the ice cream and craft creative flavors and toppings. Keep experimenting—soon, you’ll master the art of visually stunning, delicious rolled ice cream.
Key Takeaways
- Use a pre-frozen, cold metal surface or cold plate to quickly freeze the ice cream mixture for rolling.
- Spread the mixture into a thin, even layer with a spatula to facilitate easy rolling and aesthetic presentation.
- Incorporate flavor variations, swirls, and toppings during spreading to create visual interest and unique tastes.
- Utilize tools like metal spatulas, small scoops, and piping bags for precise application and shaping of the ice cream.
- Experiment with toppings and presentation styles for creative, colorful displays that enhance visual appeal.
Have you ever wondered how to make delicious rolled ice cream right at home? It’s easier than you might think, and with a few simple tools and techniques, you can craft a treat that’s both visually stunning and bursting with flavor. The key to creating truly impressive rolled ice cream lies in your approach to presentation and your willingness to experiment with different flavors. When you master the right tools and techniques, you’ll find that the process becomes an exciting art form where you can let your creativity run wild.
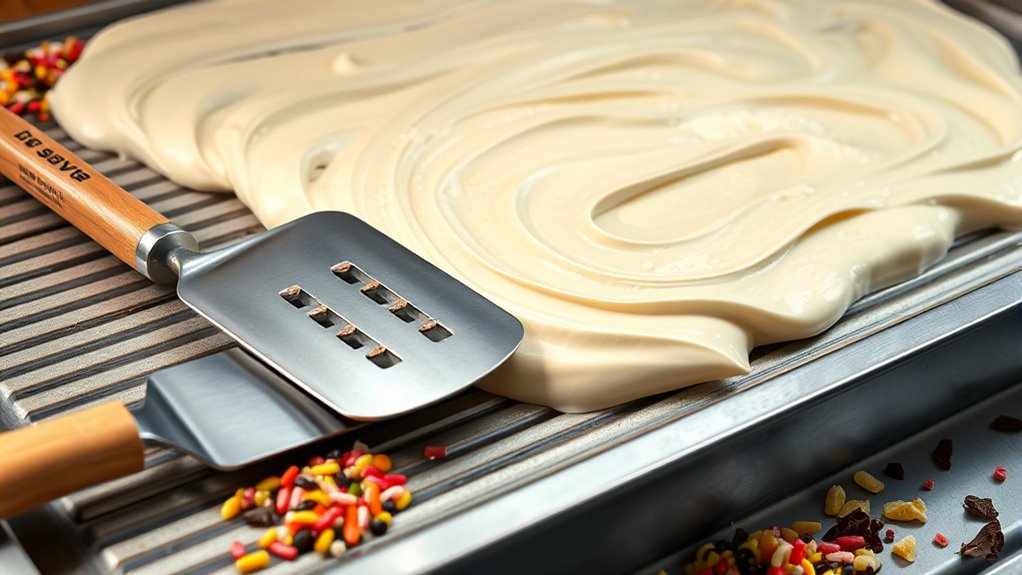
To start, you’ll need a chilled, flat metal surface or a specialized cold plate. This is essential because the ice cream mixture needs to freeze quickly as you spread and manipulate it. A stainless steel baking sheet or a commercial cold plate works well, but the colder, the better. Make sure it’s placed on a sturdy surface and pre-frozen for at least 4-6 hours before beginning. This ensures the mixture solidifies rapidly, allowing you to roll it smoothly. You’ll also want a spatula or scraper—preferably metal—since it helps to evenly spread and manipulate the mixture without sticking. Some people use small scoops or piping bags to add their mixture, especially when creating layered or multi-flavor designs, which enhances the creative presentation.
Once your tools are ready, pour your ice cream base onto the cold surface. This base can be anything from traditional vanilla or chocolate to more adventurous flavors like matcha, blueberry, or even exotic spices. As you pour, use your spatula to spread the mixture into a thin, even layer. The rapid freezing process is what makes rolling possible—so work quickly but carefully. Once the mixture is firm but still pliable, use your spatula to scrape and roll the ice cream into tight cylinders. This is where your flavor experimentation truly shines—try swirling in fruit purees, cookie crumbs, or swirls of caramel or fudge as you spread or during the rolling process to add layers of taste and visual appeal.
Additionally, understanding how color temperature adjustments affect the visual appeal can help you create more vibrant and attractive rolled ice cream. Presentation is everything, so think about how you display your creations. Use colorful bowls, decorative spoons, and toppings like fresh fruit, chopped nuts, or sprinkles to elevate your rolled ice cream. The more creative your presentation, the more enticing your dessert becomes. Remember, the key is to keep experimenting—try different flavor combinations, textures, and toppings to discover what you enjoy most. With practice, you’ll develop your own style for rolling and serving, transforming a simple dessert into a true culinary canvas. Making homemade rolled ice cream is not only satisfying but also a fantastic way to showcase your creativity and love for flavor experimentation.
Frequently Asked Questions
Can I Make Rolled Ice Cream Without Specialized Tools?
Yes, you can make homemade ice cream using the rolled technique without specialized tools. Instead of a metal pan, use a flat, freezer-safe surface like a baking sheet lined with plastic wrap. Spread your ice cream mixture thinly and freeze until firm. Then, use a spatula or scraper to fold and roll the ice cream, mimicking the traditional rolled method. It’s a simple, fun way to enjoy homemade rolled ice cream without extra equipment.
What Are the Best Ingredients for Homemade Rolled Ice Cream?
They say “you are what you eat,” so choose your ingredients wisely. For homemade rolled ice cream, the best ingredients include good-quality dairy or dairy alternatives like coconut or almond milk, combined with flavorful additions like fruit purees, chocolate, or nuts. Experiment with flavor combinations to suit your taste. Fresh ingredients make your ice cream creamy and delicious, so don’t be afraid to get creative and try new mixes!
How Long Does It Take to Freeze the Mixture Properly?
It typically takes about 2 to 3 hours to freeze the mixture properly, depending on your freezer’s temperature. For ideal results, set your freezer to around -20°C (-4°F). Keep an eye on the mixture; it should be firm enough to scoop and roll without being too hard. Proper freezing time and maintaining the best temperature ensure your ice cream rolls come out perfectly smooth and delicious.
Can I Customize Flavors and Add-Ins Easily?
Sure, customizing flavors and add-ins is a breeze—think of it as painting your ice cream masterpiece. You have endless ingredient flexibility, so you can mix in anything from fresh fruit to candies. Just imagine creating wild flavor combinations that reflect your mood or cravings, all with ease. No limits here—your creativity is the only boundary, making each batch uniquely yours and wildly delicious.
How Do I Store Leftover Rolled Ice Cream?
You should store leftover rolled ice cream in an airtight container to keep it fresh. Opt for a shallow, freezer-safe container to prevent ice crystals and maintain texture. Wrap the rolled ice cream tightly with plastic wrap before sealing to avoid freezer burn. Place it in the coldest part of your freezer and consume within a week for the best flavor and consistency. Proper ice cream storage guarantees your leftovers stay delicious!
Conclusion
Now that you’ve learned the tools and techniques, you’re ready to create your own delicious rolled ice cream at home. Remember, practice makes perfect—don’t be discouraged if your first few attempts aren’t flawless. Keep experimenting, and soon you’ll master the art of perfect rolls. As the saying goes, “Rome wasn’t built in a day,” so enjoy the process and savor every sweet success along the way!