
To make delicious milk chocolate ice cream, chop 1 cup of milk chocolate and set it aside. Heat 1 cup of whole milk and 2 cups of heavy cream. Whisk 3/4 cup sugar and 4 egg yolks until fluffy, then combine with the warm milk mixture. Cook until thickened, then stir in the chocolate, vanilla, and a pinch of salt. Chill well before churning for a creamy delight. Want more tips and variations to enhance your ice cream experience?
Key Takeaways
- Combine chopped milk chocolate, whole milk, heavy cream, sugar, egg yolks, vanilla extract, and salt for a rich ice cream base.
- Heat the milk and cream mixture gently, then whisk in the egg yolks and sugar until thickened.
- Chill the mixture thoroughly for at least 2 hours to enhance flavor before churning.
- Use an ice cream maker to churn the mixture until creamy, adding any desired mix-ins.
- Serve in bowls or cones, garnished with chocolate shavings or nuts for an elegant presentation.

Nostalgia Electric Ice Cream Maker With 4 Qt Capacity- Old Fashioned Ice Cream Machine Makes Frozen Yogurt or Gelato in Minutes- Vintage Wooden Style Ice Cream Maker with Aluminum Canister- Light Wood
Effortless Ice Cream in Minutes: Say goodbye to the hassle of manual churning and hello to the convenience…
As an affiliate, we earn on qualifying purchases.
As an affiliate, we earn on qualifying purchases.
History
Milk chocolate ice cream has a rich history that dates back to the 18th century, when chocolate became a popular treat in Europe. Initially, chocolate was consumed as a drink, enjoyed by the elite.
As techniques improved, sweet confections emerged, paving the way for ice cream. By the 19th century, ice cream makers started experimenting with chocolate flavors, leading to the creation of milk chocolate ice cream.
This delightful blend of creamy ice cream and sweet chocolate quickly gained traction, capturing the hearts of dessert lovers. As refrigeration technology advanced, making ice cream at home became more accessible.
Today, milk chocolate ice cream is a beloved favorite, enjoyed in scoops, sundaes, and shakes around the world, showcasing its enduring appeal.
Nostalgia Electric Ice Cream Maker With 4 Qt Capacity- Old Fashioned Ice Cream Machine Makes Frozen Yogurt or Gelato in Minutes- Vintage Wooden Style Ice Cream Maker with Aluminum Canister- Light Wood
Effortless Ice Cream in Minutes: Say goodbye to the hassle of manual churning and hello to the convenience…
As an affiliate, we earn on qualifying purchases.
As an affiliate, we earn on qualifying purchases.
Recipe
Indulging in homemade milk chocolate ice cream is a delightful way to enjoy a classic treat. This creamy, rich dessert is perfect for any occasion, whether it’s a hot summer day or a cozy night in. Making your own ice cream allows you to control the sweetness and richness, bringing out the smooth flavors of milk chocolate.
Plus, with just a few simple ingredients, you’ll be able to whip up a batch that’s sure to impress friends and family alike. To get started, you’ll need a reliable ice cream maker, as this will help you achieve the perfect creamy texture.
The process involves melting chocolate and combining it with a luscious custard base made from eggs, sugar, milk, and cream. Once churned, the result is a delectable treat that can be enjoyed on its own or paired with your favorite toppings. So grab your ingredients and let’s get started on this mouthwatering milk chocolate ice cream!
Ingredients:
- 1 cup milk chocolate, chopped
- 1 cup whole milk
- 2 cups heavy cream
- 3/4 cup granulated sugar
- 4 large egg yolks
- 1 teaspoon vanilla extract
- A pinch of salt
Cooking Instructions:
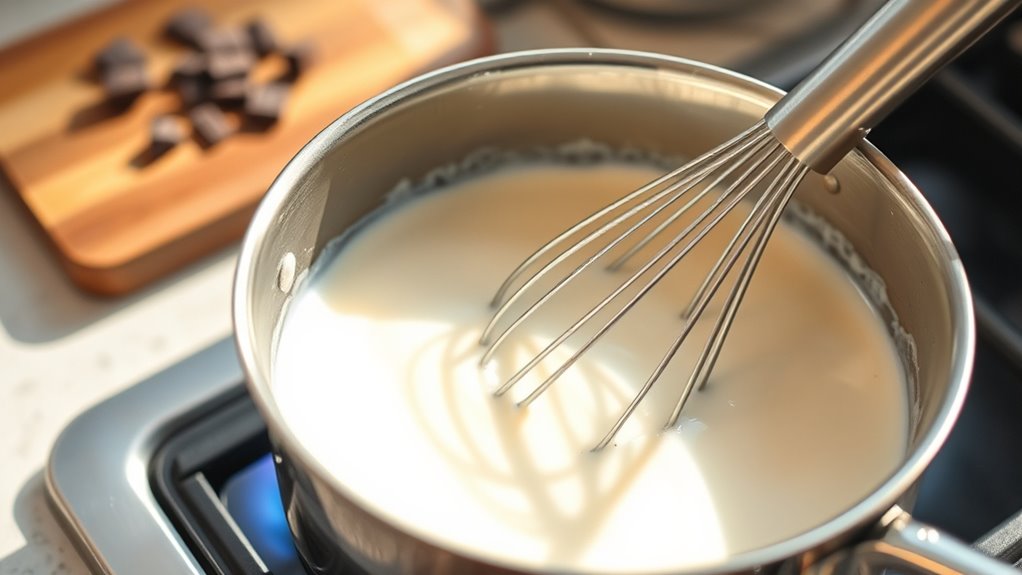
In a medium saucepan, heat the whole milk and half of the heavy cream over medium heat until it’s warm but not boiling.
Meanwhile, in a separate bowl, whisk together the egg yolks and sugar until pale and fluffy. Once the milk mixture is warm, gradually pour it into the egg mixture while whisking constantly to temper the eggs.
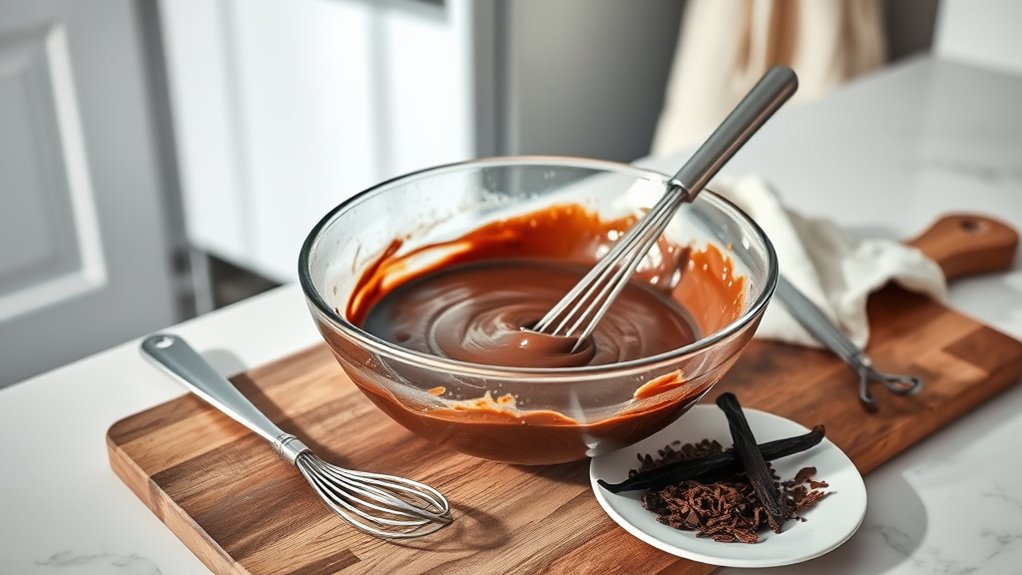
Return the combined mixture to the saucepan and cook over low heat, stirring continuously until it thickens enough to coat the back of a spoon. Remove from heat and stir in the chopped milk chocolate, remaining heavy cream, vanilla extract, and salt until everything is well combined and the chocolate is completely melted.
Allow the mixture to cool to room temperature, then refrigerate for at least 4 hours or until completely chilled. Once chilled, churn the mixture in your ice cream maker according to the manufacturer’s instructions until it reaches a soft-serve consistency.
Transfer to an airtight container and freeze for at least 4 hours before serving.
Extra Tips:
For a richer flavor, consider adding a touch of espresso powder to the chocolate mixture before churning.
If you don’t have an ice cream maker, you can pour the mixture into a shallow dish and freeze it, stirring every 30 minutes for the first few hours to break up ice crystals until it reaches the desired consistency.
Feel free to mix in your favorite add-ins, like crushed cookies or nuts, during the last few minutes of churning for an extra special treat!

Fox Run Brands 2.75-Quart Stainless Steel Mixing Bowl, 9 x 9 x 4 inches, Metallic
ELEGANT STAINLESS STEEL MIXING BOWL provides a classic design for years of use that will never go out…
As an affiliate, we earn on qualifying purchases.
As an affiliate, we earn on qualifying purchases.
Cooking Steps
Now that you’ve gathered all your ingredients, it’s time to get cooking.
Start by heating the milk and cream mixture, then add in the sugar and cocoa for that rich flavor.
After chilling the mixture for two hours, you’ll be ready to churn it to a creamy consistency.
Step 1. Gather All Ingredients Needed

Gathering all the necessary ingredients is essential for making delicious milk chocolate ice cream. You’ll need whole milk, heavy cream, granulated sugar, milk chocolate, and vanilla extract.
Start by measuring two cups of whole milk and one cup of heavy cream. Then, grab three-quarters of a cup of granulated sugar to sweeten your ice cream perfectly.
Next, select high-quality milk chocolate for a rich flavor; about six ounces should do. Finally, don’t forget one teaspoon of vanilla extract to enhance the taste.
Be sure to have all these ingredients ready before you start, as it’ll streamline the process and help you focus on creating that creamy, dreamy treat. Enjoy the satisfaction of being fully prepared!
Step 2. Heat Milk and Cream Mixture
Once you’ve measured out your ingredients, it’s time to heat the milk and cream mixture.
In a medium saucepan, combine your milk and heavy cream over medium heat. Stir the mixture gently to guarantee it warms evenly. Keep an eye on it, as you don’t want it to boil.
You’re aiming for a gentle simmer, where small bubbles begin to form around the edges. This process helps to blend the flavors and create a smooth base for your ice cream.
Once you see those bubbles, remove the saucepan from the heat. Let it sit for a minute to cool slightly before moving on to the next step in your delicious homemade milk chocolate ice cream journey.
Step 3. Add Sugar and Cocoa
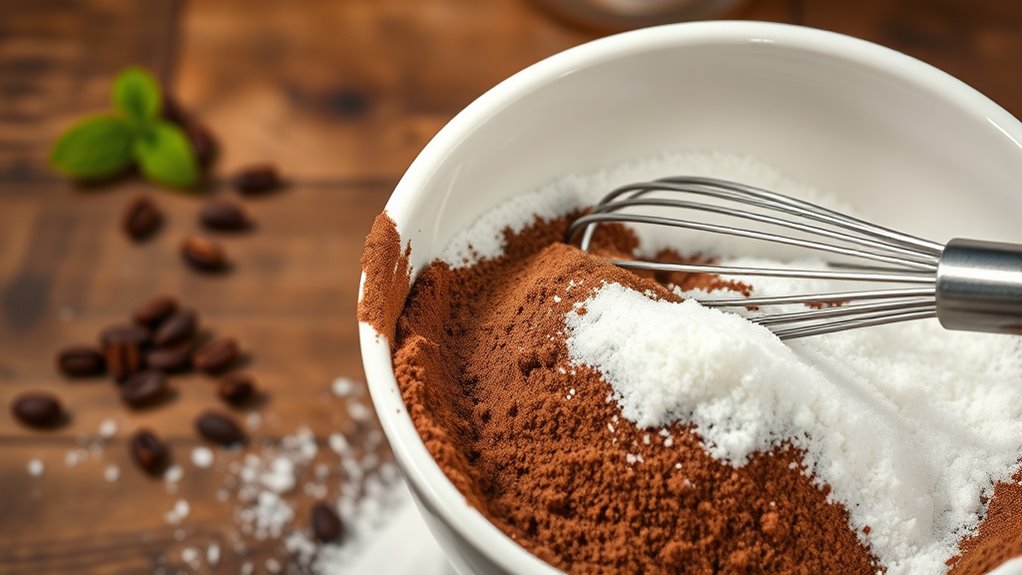
To create a rich and flavorful ice cream base, add your sugar and cocoa powder to the warm milk and cream mixture.
Stir gently but thoroughly until both the sugar and cocoa dissolve completely, creating a smooth blend. This step is vital, as it guarantees your ice cream will have that deep, chocolatey taste you crave.
If you notice any lumps from the cocoa, don’t worry; just keep stirring until everything is well combined.
Once you achieve a uniform consistency, taste the mixture. If you want it sweeter, feel free to add a bit more sugar.
Remember, the flavors will intensify as it freezes, so balance is key.
Get ready; your chocolate base is almost ready for the next step!
Step 4. Chill Mixture for 2 Hours
After you’ve combined the sugar and cocoa with the milk and cream, it’s essential to chill the mixture for about 2 hours.
This step guarantees that the flavors meld beautifully, creating a rich and creamy ice cream base.
Pour the mixture into a bowl or container that’s suitable for the fridge, and cover it tightly to prevent any unwanted odors from seeping in.
Make certain your fridge is set at the right temperature—around 40°F (4°C)—for ideal chilling.
While you wait, you can clean up your workspace and prepare for the next steps.
Remember, patience is key here; skipping this chilling period could result in a less creamy texture.
Enjoy the anticipation of your delicious homemade ice cream!
Step 5. Churn Until Creamy Consistency

Now it’s time to churn your chilled mixture until it reaches a creamy consistency.
If you’re using an ice cream maker, pour the mixture into the machine and follow the manufacturer’s instructions. Turn it on and let the churning begin! You’ll want to churn for about 20 to 30 minutes, or until it thickens and becomes smooth.
Keep an eye on it; the magic happens as air gets incorporated, giving your ice cream that delightful texture.
If you don’t have an ice cream maker, you can pour the mixture into a shallow dish and stir it every 30 minutes for about 2 to 3 hours.
Your goal is to achieve that rich, creamy goodness that makes milk chocolate ice cream irresistible!

Ranvaira Slushie Machine, Ice Cream Maker, Slushy Machine for Home and Families, No ice needed with Rapid Chill & Temperature Control, Multi-function for Margarita, Frappé, Easy to Clean, Black
NO ICE NEEDED & READY IN 15 MINS: Say goodbye to watered-down drinks and noisy blending! Featuring advanced…
As an affiliate, we earn on qualifying purchases.
As an affiliate, we earn on qualifying purchases.
Final Thoughts
As you savor your homemade milk chocolate ice cream, take a moment to appreciate the simple joy it brings.
Creating this delightful treat isn’t just about the flavors; it’s also about the memories you make along the way. Whether you share it with family or enjoy it during a quiet evening, each scoop is a reminder of the comforts of homemade goodness.
Don’t hesitate to experiment with add-ins like nuts or swirls of caramel to personalize your creation. Remember, the key to great ice cream is patience—allow it to chill properly for the best texture.
Frequently Asked Questions
Can I Use Dark Chocolate Instead of Milk Chocolate?
Sure, you can use dark chocolate instead of milk chocolate!
You might think it’ll make your dish too bitter, but the richness of dark chocolate actually adds depth and complexity.
Just keep in mind that dark chocolate has less sugar and more cocoa, so you might want to adjust the sweetness in your recipe.
Experimenting with different chocolate types can lead to delicious results, so don’t hesitate to give it a try!
How Long Does Homemade Ice Cream Last in the Freezer?
Homemade ice cream typically lasts about two to three weeks in the freezer when stored properly.
Just make sure you seal it in an airtight container to prevent ice crystals from forming.
While it might still be safe to eat after that time, the texture and flavor may start to decline.
Is It Safe to Eat Raw Eggs in Ice Cream?
You’d think eating raw eggs in ice cream would be a delightful risk, but it’s not without concerns.
Consuming raw eggs can expose you to salmonella, which isn’t the kind of surprise you want in your dessert. If you’re game for the challenge, consider using pasteurized eggs instead.
They’re a safer option and still give you that rich, creamy texture you crave.
Can I Make This Recipe Dairy-Free?
Absolutely, you can make a dairy-free version!
Start by substituting traditional dairy with plant-based alternatives, like coconut milk or almond milk, which work well for creamy textures. You can also use dairy-free chocolate to maintain that rich flavor.
Just guarantee any other ingredients, like sweeteners or flavorings, are also dairy-free.
It’s a simple switch that’ll let you enjoy the same delicious taste without the dairy.
Enjoy your ice cream-making adventure!
What Equipment Do I Need to Make Ice Cream at Home?
Imagine you’re a wizard in your kitchen, conjuring up delicious ice cream. To wield your magic, you’ll need a few essential tools.
Grab an ice cream maker to churn your creamy potion, a mixing bowl for combining ingredients, and measuring cups for precision.
Don’t forget a spatula to scrape every bit of goodness. Finally, a freezer-safe container’s vital to store your enchanting creation.
With these, you’re ready to craft your frozen masterpiece!