Looking for invigorating summer ice cream recipes? You can whip up delicious treats like mango coconut sorbet, perfect for cooling off in the heat. All you need are ripe mangoes, coconut milk, sugar, and lime juice for a light, fruity dessert. Making ice cream at home lets you experiment with flavors and textures while bringing family and friends together. Keep it light and fruity, and you’ll discover even more delightful options to try this summer!
Key Takeaways
- Try a Mango Coconut Sorbet for a light, dairy-free dessert that captures tropical flavors perfect for summer.
- Use fresh summer fruits like berries or peaches to create flavorful ice creams that celebrate seasonal produce.
- Experiment with unique ingredients like rum or toasted coconut flakes to add depth to your homemade ice cream.
- Serve ice cream in bowls or cones, garnished with fresh mint and various toppings for a customizable treat.
- Enjoy making ice cream as a fun social activity with family and friends during warm summer gatherings.
History
Ice cream has a rich history that dates back thousands of years, with its origins believed to be in ancient China around 200 BC, where a mixture of milk and rice was packed in snow to create a frozen treat.
Ice cream’s origins trace back to ancient China, where milk and rice were frozen in snow around 200 BC.
As you explore its journey, you’ll find that it spread through the Middle East and Europe, evolving into various forms.
By the 16th century, ice cream made its way to Italy, delighting nobility.
When it arrived in America, it quickly became a favorite among the general public.
The invention of the ice cream maker in the 19th century revolutionized production, making it more accessible.
Today, you enjoy countless flavors, thanks to this fascinating history that blends cultures and innovations.
Recipe
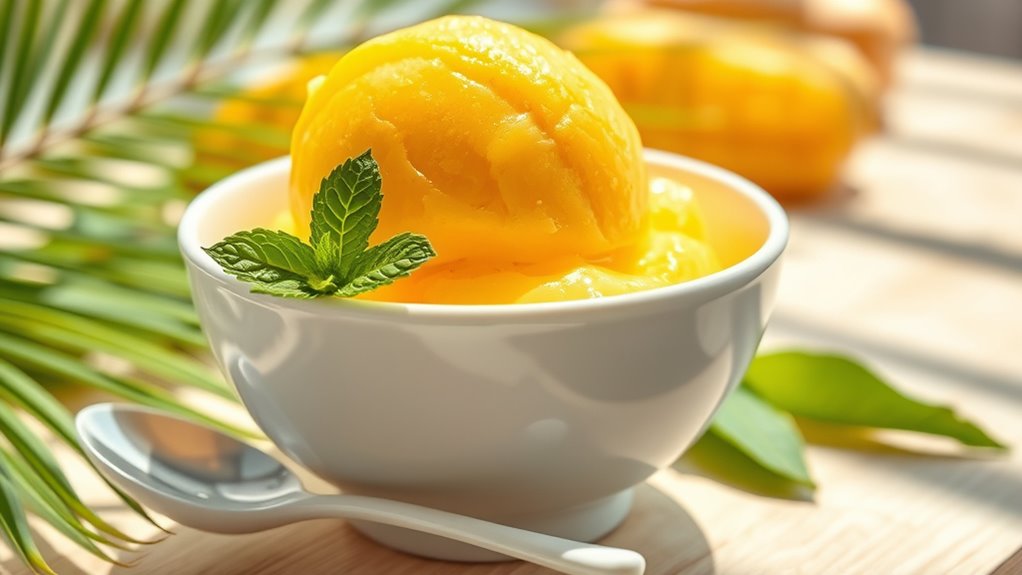
As the heat of summer sets in, there’s nothing quite like a revitalizing scoop of homemade ice cream to cool you down. This Mango Coconut Sorbet is a delightful blend of tropical flavors that isn’t only delicious but also incredibly easy to make.
With ripe mangoes and creamy coconut milk, this recipe is perfect for those seeking a light and fruity dessert that brings a taste of paradise to your backyard.
Making your own sorbet allows you to control the ingredients and customize the sweetness to your liking. This recipe is dairy-free, making it an excellent option for those with dietary restrictions.
Plus, it requires just a few simple ingredients, and the end result is a vibrant, revitalizing treat that will impress your family and friends during those hot summer days.
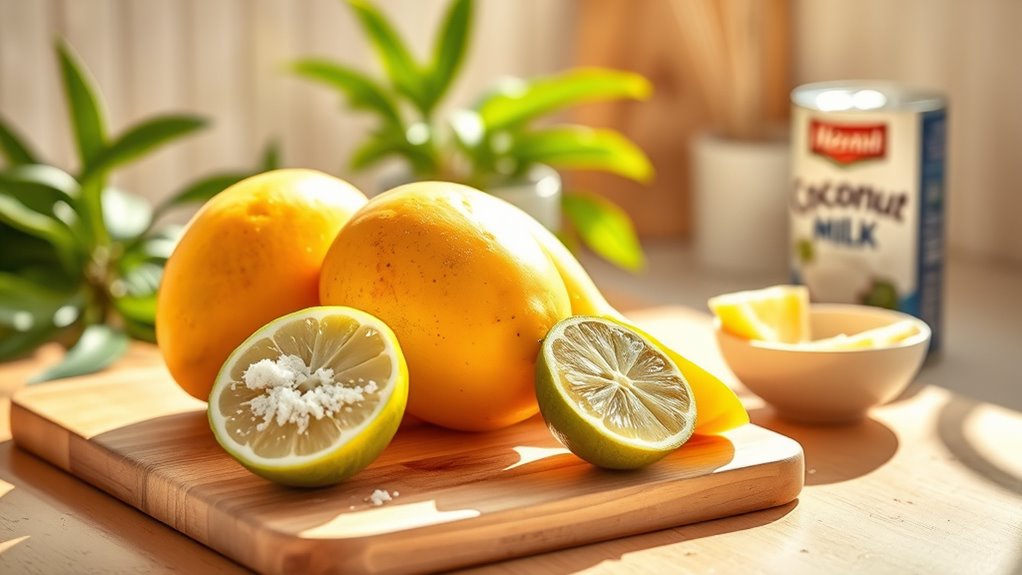
Ingredients:
- 3 ripe mangoes, peeled and diced
- 1 cup coconut milk
- 1/2 cup sugar (or to taste)
- 1 tablespoon lime juice
- Pinch of salt
Instructions:
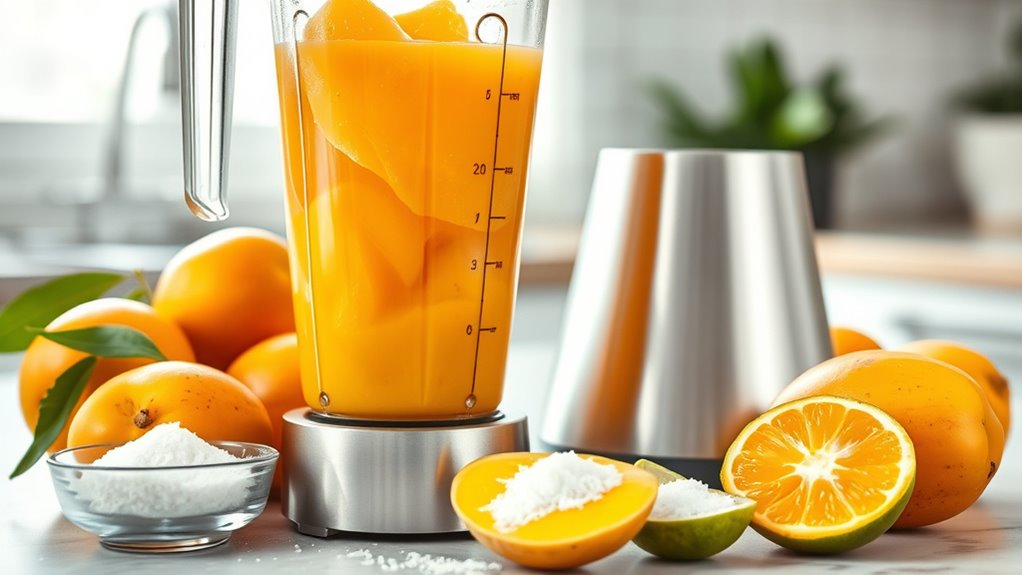
In a blender, combine the diced mangoes, coconut milk, sugar, lime juice, and salt. Blend the mixture until smooth and creamy.
Taste the mixture to adjust the sweetness if necessary. Once blended, pour the mixture into a shallow dish or an ice cream maker.
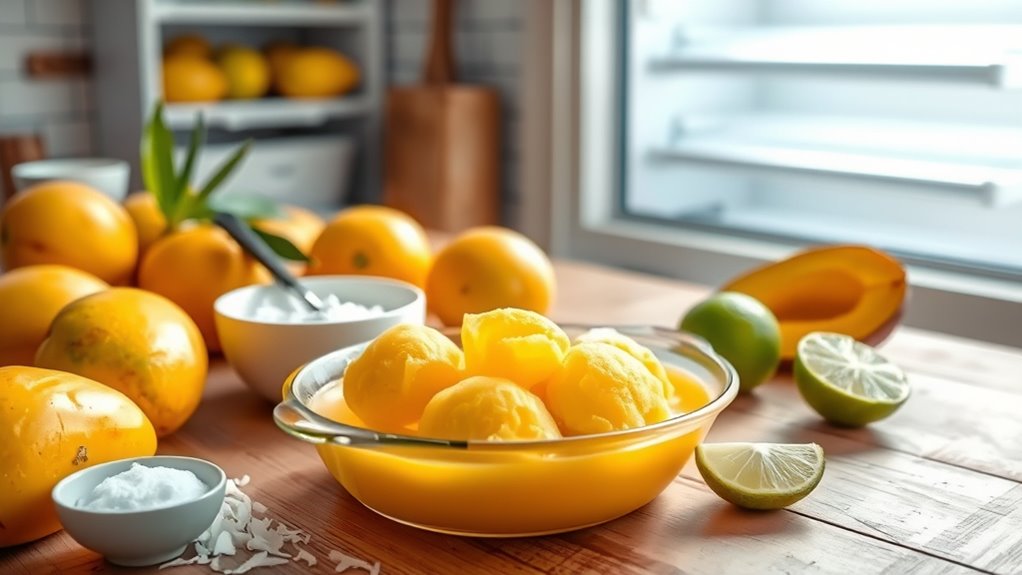
If using a shallow dish, place it in the freezer and stir every 30 minutes to break up any ice crystals until the sorbet is firm and fluffy, about 3-4 hours. If using an ice cream maker, follow the manufacturer’s instructions for churning until it reaches a soft-serve consistency, then transfer it to a container and freeze until firm.
Extra Tips:
For an extra burst of flavor, consider adding a splash of rum for an adult twist or mixing in some toasted coconut flakes before freezing.
Make sure to use ripe mangoes for the best flavor and sweetness. If you don’t have fresh mangoes, frozen mango chunks can also be used, but you may need to adjust the sugar based on their sweetness.
Enjoy your homemade sorbet within a week for the best texture and flavor!
Cooking Steps
To kick off your ice cream-making adventure, start by gathering fresh summer fruits that’ll bring vibrant flavors to your treat. Next, blend the ingredients until smooth to create a delicious base. Once that’s done, chill the mixture in the freezer to achieve that perfect creamy texture. Additionally, consider incorporating unique homemade fruit juice recipes to enhance the flavor profile of your ice cream.
Step 1. Gather Fresh Summer Fruits
Gathering fresh summer fruits is key to creating delicious ice cream that bursts with flavor. Head to your local farmers’ market or grocery store, and look for ripe, seasonal fruits like strawberries, peaches, blueberries, and cherries.
Choose fruits that are vibrant in color and free from blemishes. Don’t hesitate to sample before buying; the sweeter the fruit, the better your ice cream will taste. If possible, pick your own fruits at local orchards to guarantee maximum freshness.
Once you’ve selected your favorites, wash them thoroughly to remove any dirt or pesticides. Remove any stems, pits, or cores, and slice them into manageable pieces.
You’re now ready to elevate your ice cream with these fresh, juicy ingredients!
Step 2. Blend Ingredients Until Smooth
Start by tossing your fresh fruits into a blender or food processor.
Add in any additional ingredients, like yogurt, milk, or sweeteners, depending on your recipe.
Secure the lid tightly to prevent any spills, then pulse the mixture a few times to break down the larger pieces.
Once you’ve done that, blend on high speed until everything’s smooth and creamy. This usually takes about 30 seconds to a minute, but keep an eye on it to avoid over-blending.
If the mixture seems too thick, you can add a splash of milk or juice to help it reach your desired consistency.
Taste it and adjust the sweetness if needed before moving on to the next step.
Enjoy the vibrant colors! Remember, vanilla remains the most popular flavor, accounting for nearly 30% of all sales in the ice cream market.
Step 3. Chill Mixture in Freezer
Once your mixture is smooth and creamy, pour it into a shallow container or ice cream maker.
If you’re using a shallow container, make sure it’s wide enough to allow the mixture to freeze evenly. Cover it with a lid or plastic wrap to prevent ice crystals from forming.
Place the container in the freezer and set a timer for every 30 minutes. During this time, stir the mixture vigorously using a fork or whisk to break up any ice crystals that form.
Repeat this process for about 2 to 3 hours, or until the ice cream reaches your desired consistency. Additionally, you can enhance the flavor and texture by incorporating frozen yogurt pops, which can provide a refreshing twist to your homemade ice cream.
If you’re using an ice cream maker, follow the manufacturer’s instructions for freezing.
Enjoy the anticipation!
Step 4. Serve With Fresh Mint
To elevate your homemade ice cream, serve it with fresh mint, which adds a burst of flavor and a pop of color.
Start by picking a handful of vibrant mint leaves. Rinse them under cold water to remove any dirt. Pat them dry gently with a paper towel.
Next, tear the leaves into smaller pieces to release their essential oils.
Once your ice cream’s ready, scoop it into bowls or cones. Strategically place the torn mint leaves on top for an appealing presentation.
For an extra touch, you can even add a sprig of mint as a garnish. The fresh mint not only enhances the look but also complements the creamy sweetness, making each bite invigorating and delightful.
Enjoy!
Step 5. Add Toppings of Choice

While your ice cream is still soft and easy to scoop, it’s the perfect time to add your favorite toppings.
Grab your chosen ingredients—think chocolate syrup, caramel, sprinkles, crushed nuts, or fresh fruit. Start by drizzling your syrups over the ice cream, letting them create a beautiful pattern.
Next, sprinkle on the crunchy toppings for some texture. If you’re using fruit, chop it up and add a generous handful for a revitalizing burst.
Don’t forget to include whipped cream or a cherry on top for that classic touch! Mix and match to create your ultimate combination.
The key is to go wild and have fun with it, making each scoop uniquely yours. Enjoy every delicious bite!
Final Thoughts
As summer days heat up, there’s no better time to indulge in homemade ice cream that captures the essence of the season.
With endless flavor combinations and topping options, you can create a delightful treat tailored to your taste. Whether you prefer fruity sorbets or creamy concoctions, making ice cream at home is a fun way to cool off and get creative in the kitchen.
Create your own delicious ice cream at home, experimenting with flavors and toppings for a refreshing summer treat.
Plus, it’s a fantastic opportunity to share special moments with family and friends. Don’t hesitate to experiment with flavors and textures; the sky’s the limit!
So, gather your ingredients, fire up your ice cream maker, and enjoy the sweet rewards of your labor.
Summer’s here, and it’s the perfect excuse to treat yourself!
Frequently Asked Questions
Can I Use Dairy-Free Alternatives for These Ice Cream Recipes?
Absolutely, you can use dairy-free alternatives for these recipes.
Whether you choose coconut milk, almond milk, or cashew cream, you’re expanding your options. You’re not just substituting; you’re creating a deliciously creamy texture and enhancing flavors.
You’ll find that many dairy-free options blend beautifully with various ingredients, making your ice cream rich and satisfying.
How Long Does Homemade Ice Cream Last in the Freezer?
Homemade ice cream typically lasts about two to three weeks in the freezer.
After that, you might notice changes in texture and flavor.
To keep it fresh, store it in an airtight container and press a piece of plastic wrap against the surface to minimize air exposure.
If you notice ice crystals forming, it’s still safe to eat, but the quality mightn’t be the same.
Enjoy your treat while it’s at its best!
Are There Any Tips for Achieving a Creamier Texture?
To achieve a creamier texture in your ice cream, start by using high-fat dairy, like heavy cream.
Make sure you chill your mixture thoroughly before churning it; this helps incorporate air better.
Don’t forget to churn it for the right amount of time—over-churning can lead to ice crystals.
Finally, consider adding a touch of alcohol, which can lower the freezing point and enhance creaminess.
Enjoy your deliciously smooth treat!
Can I Mix Different Flavors in One Batch?
Did you know that over 90% of people enjoy mixing flavors in their desserts?
You can absolutely mix different flavors in one batch! It’s a fun way to create unique combinations.
Just make sure to balance the flavors so one doesn’t overpower the other. Swirl them together gently for a marbled effect, or blend them fully for a uniform taste.
Experimenting can lead to delicious surprises that will impress your friends!
What Equipment Do I Need to Make Ice Cream at Home?
To make ice cream at home, you’ll need a few essential pieces of equipment.
Start with an ice cream maker, which can be electric or manual. You’ll also want mixing bowls for combining ingredients and a whisk or spatula for stirring.
Don’t forget an airtight container for storing your finished product. If you’re going the no-churn route, just a hand mixer or blender will work too!
Enjoy creating your delicious treats!