
Making ice cream in a bag is a fun way for kids to explore science while enjoying a tasty treat! You’ll need milk, sugar, vanilla, ice, and salt. Just mix the ingredients in a smaller bag, seal it tight, and place it inside a larger bag filled with ice and salt. Shake it up for 10-15 minutes to create delicious ice cream. This hands-on project teaches scientific concepts and can be customized with different flavors. Curious about what else you can do?
Key Takeaways
- Ice cream in a bag is a fun, hands-on science project that teaches kids about freezing point depression and states of matter.
- The process involves mixing ingredients in a smaller bag, sealing it, and shaking it in a larger bag filled with ice and salt.
- Kids observe the transformation from liquid to solid while learning about emulsions and the role of air and fat in ice cream.
- This project promotes teamwork, creativity in flavor experimentation, and offers opportunities for sharing results and feedback.
- Safety precautions, like using gloves and supervising children, are essential for a successful and enjoyable ice cream-making experience.

Ziploc Quart Food Storage Bags, Stand-Up Bottom, Easy to Fill, 80 Count
- Food Preservation: Extends food freshness
- Reduces Food Waste: Helps fight food waste
- Unbeatable Freshness: Keeps food fresher longer
As an affiliate, we earn on qualifying purchases.
As an affiliate, we earn on qualifying purchases.
Materials and Ingredients Needed

To make delicious ice cream in a bag, you’ll need a few essential ingredients and materials. Start with milk or a dairy-free alternative like whole milk or heavy whipping cream. You’ll also need 1-2 tablespoons of sugar and ¼ to 1 teaspoon of vanilla extract for flavor. Gather about 3-4 cups of ice and ¼ to ½ cup of rock salt or ice cream salt to help the freezing process. The salt and ice mixture lowers the freezing point, allowing for colder temperatures that are crucial for ice cream formation. Additionally, be mindful that ice cream consumption can lead to health issues if not enjoyed in moderation.
For equipment, grab at least two quart-size Ziploc bags and one gallon-size bag. Measuring cups and spoons are vital too. Don’t forget gloves or towels to handle the cold bags! Optional toppings like sprinkles or chocolate chips can add a fun twist to your homemade ice cream. Enjoy the process!
Understanding the Science Behind Ice Cream

Making ice cream in a bag isn’t just about mixing ingredients; it also involves some fascinating science. Ice cream is a complex material made up of fat droplets, sugar, and water, forming an emulsion. When you whip the mixture, air bubbles create foam, enhancing texture. As the mixture partially freezes, tiny ice crystals form, while sugar lowers the freezing point, leaving some water unfrozen. Adding salt to ice further cools the mixture, essential for freezing without an ice cream maker. This process not only helps control temperature but also impacts the size of ice crystals, affecting the creaminess of your treat. The structure contains fat droplets that stabilize the emulsion and ensure a creamy texture in the final product. Understanding these elements makes your homemade ice cream even more enjoyable!
Step-by-Step Project Procedure

As you immerse yourself in this exciting ice cream science project, gathering your ingredients is the essential first step.
You’ll need half-and-half, sugar, vanilla extract, ice, and salt. Optional ingredients like chocolate syrup can add flavor. Choose your preferred dairy or non-dairy alternatives, such as almond or soy milk.
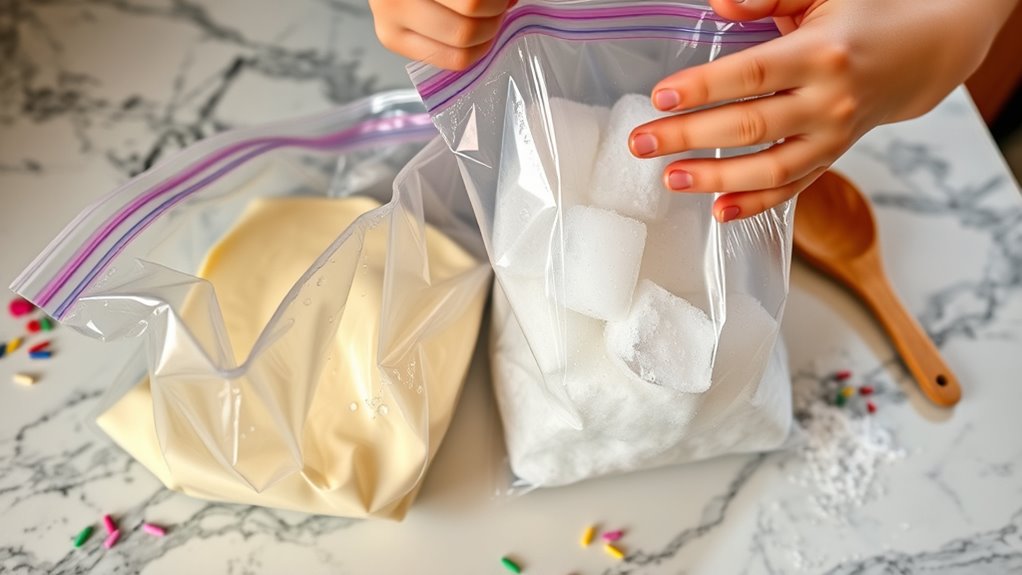
Next, fill a large resealable plastic bag with about 3 cups of ice and ⅓ cup of salt. In a smaller bag, mix the half-and-half, sugar, and vanilla, then seal both bags tightly, removing excess air from the smaller bag. Salt lowers the freezing point of ice, making it crucial for effectively freezing your ice cream.
Place the smaller bag inside the larger one and seal it. Now, shake the large bag vigorously for 10 to 15 minutes until your ice cream forms. Enjoy the transformation!
Educational Benefits of the Experiment

This ice cream science project offers countless educational benefits that go beyond just making a tasty treat. You’ll engage in hands-on learning, enhancing your understanding of scientific principles like freezing point depression and states of matter. As you mix ingredients, you’ll observe how liquids change to solids and experience energy transfer between warmer mixtures and colder ice. This project also fosters STEAM skills, combining science, technology, engineering, art, and math through measuring and experimenting. You’ll build character, learning perseverance, collaboration, and problem-solving as you troubleshoot challenges. Additionally, you will discover how to use ice and salt to create ice cream, further enriching your understanding of these concepts. Your curiosity will flourish as you test different flavors and conditions, making the learning experience both fun and rewarding.
Get ready to plunge into science while enjoying delicious ice cream!
Safety Precautions to Consider

While diving into the fun of making ice cream, it’s essential to prioritize safety to guarantee a smooth experience.
Start by wearing gloves or mitts when handling the ice bag to protect your hands from extreme cold. Wrapping the bag in a towel can also provide insulation. Always supervise children closely to prevent any choking hazards from plastic bags. Additionally, make sure to explain that salt lowers the freezing point of ice, making it an important ingredient for the ice cream process.
Use strong freezer bags and double-bag your ice cream mixture to avoid leaks. Make certain to seal the bags tightly and handle them carefully to prevent spills.
After the experiment, dispose of ice properly to avoid slipping hazards. Finally, wash your hands before and after handling food items to guarantee hygiene and safety throughout the process.
Creative Variations and Flavor Ideas

If you’re looking to elevate your homemade ice cream experience, consider experimenting with creative variations and flavor ideas that will delight your taste buds.
Try a revitalizing Mint Chip by adding peppermint extract and mini chocolate chips. For a chocolatey twist, blend crushed Oreos with cocoa powder to make a Chocolate Lollipop.
If you prefer fruity flavors, mix yogurt with pureed strawberries or raspberries for vibrant Fruit Layers. Don’t forget to add texture; crushed nuts like almonds or pecans can enhance your creation. Ice cream in a bag is an exciting way to experiment with flavors while engaging in a fun science project. Additionally, using frozen yogurt as a base can provide a healthier alternative to traditional ice cream.
For a rich treat, incorporate browned butter and caramel sauce. Top your ice cream with chopped candy, fresh fruit, or whipped cream to add extra flair.
The possibilities are endless, so get creative!
Troubleshooting Common Issues

Creating delicious homemade ice cream can be a fun and rewarding experience, but it’s not uncommon to encounter a few bumps along the way.
If your ice cream turns out grainy, check the salt concentration; too much can freeze it too quickly. Avoid overmixing, which introduces excess air and ice crystals. Confirm you’ve got the right proportions of cream, sugar, and flavorings for peak creaminess. Keep in mind that shelf life for freshly made ice cream can be affected by how well it is stored.
If it doesn’t freeze, use enough ice and salt, and shake vigorously for about 10 minutes. Make sure your bags are tightly sealed to prevent leaks. Remember, salt lowers the freezing point of water, which is essential for the freezing process.
Finally, consider the ambient temperature; high heat can slow the freezing process, so keep everything chilled and enjoy your homemade treat!
Documenting Your Ice Cream Journey

How can you make your ice cream-making experience even more enjoyable? Start by documenting each step of your journey.
Capture photos of your ingredients—milk, sugar, salt, and vanilla extract—laid out on the counter. Record videos of the exciting shaking process, showcasing everyone’s joyful reactions. You might even consider adding colorful birthday cake flavors to enhance the fun and creativity of your ice cream.
Take notes on how different flavors affect the final product, whether you’re adding sprinkles or nuts. Observe the transformation from liquid to creamy solid, highlighting scientific principles like freezing point depression and the interaction between fat and ice.
Finally, share your delicious results digitally, whether through social media or a family presentation. This not only enhances your understanding of science but also creates lasting memories of your sweet adventure!
Frequently Asked Questions
How Long Does It Take to Make Ice Cream Using This Method?
It typically takes you about 5 to 15 minutes to make ice cream using this method.
The time varies based on the temperature outside and how effectively you shake the bags. You’ll want to keep shaking to guarantee the cream mixture freezes evenly.
Regularly check the inner bag to feel for the desired consistency. Just remember to wear gloves or use towels to protect your hands from the cold as you shake!
Can I Use Flavored Creamers Instead of Half-And-Half?
Imagine a painter mixing vibrant colors on a palette; you can definitely use flavored creamers instead of half-and-half in your ice cream creation.
These creamers bring unique flavors and can add a delightful twist. Just keep in mind that they might alter the texture a bit, so experiment with ratios to achieve your desired creaminess.
Taste along the way to balance sweetness and enjoy the process of crafting your flavorful masterpiece!
What Is the Best Type of Salt to Use?
When choosing salt, rock salt’s your best bet. Its coarse texture effectively lowers the freezing point of ice, making it ideal for chilling mixtures.
Kosher salt works well too, thanks to its larger crystals that mix easily. While table salt can be used, it isn’t as effective due to its finer grains.
Just remember to layer your salt and ice to guarantee even cooling for the best results!
How Can I Store Leftover Ice Cream?
Storing leftover ice cream is like tucking a treasure away for a rainy day.
To keep it creamy and delicious, scoop it into a freezer-proof container, leaving some headroom for expansion.
Press cling film directly on the surface to ward off pesky ice crystals, then seal it tightly.
Place it in the back of your freezer where temperatures stay steady—no more door swings!
This way, you’ll savor every last scoop like it’s fresh.
Is This Ice Cream Safe for Young Children to Eat?
Yes, this ice cream is generally safe for young children to eat.
You’ll want to check for any allergens, like dairy or nuts, based on their dietary needs. The ingredients used are typically safe, and since the process doesn’t involve cooking, there’s no risk of bacterial contamination.
Just guarantee proper hand hygiene and supervise to prevent accidents while handling the bags. With these precautions, your kids can enjoy their homemade treat worry-free!
Conclusion
Making ice cream in a bag isn’t just fun; it’s a tasty way to explore science! You might think it sounds messy, but with a little prep, it’s a breeze. Plus, the joy of creating your own flavors and enjoying a delicious treat makes it worth it. So grab your materials, get your hands a bit chilly, and plunge into this sweet science project. You’ll create lasting memories—and yummy ice cream—together!