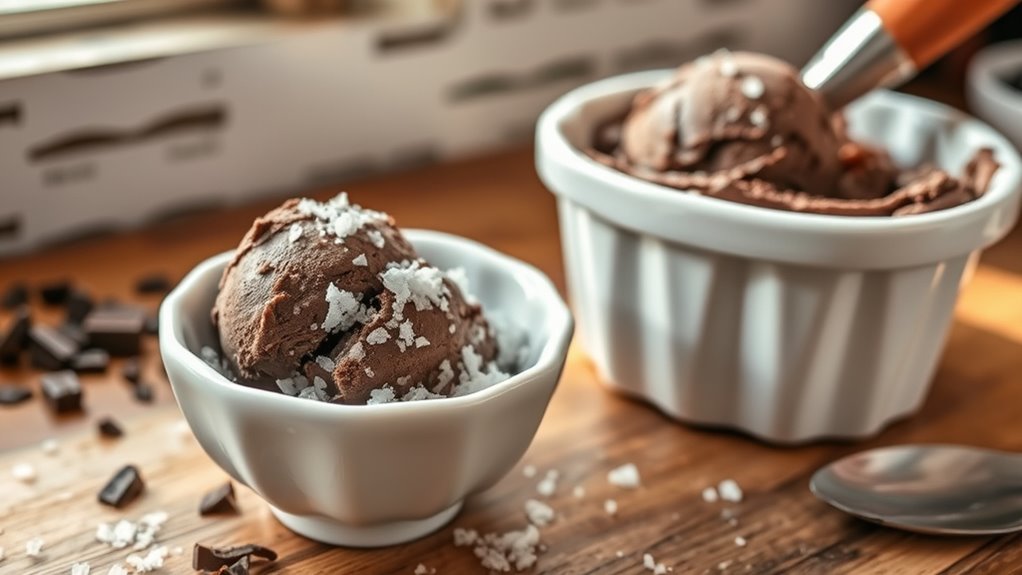
Dark chocolate ice cream with sea salt is a luxurious treat that balances rich chocolate flavors with a hint of salt. This indulgent dessert elevates the natural bitterness of dark chocolate and adds a unique twist to its sweetness. To make your own, combine heavy cream, whole milk, sugar, and high-quality dark chocolate, then churn until smooth. The result is a creamy delight that’s perfect for sharing or savoring alone. Discover more about enhancing your experience and recipes.
Key Takeaways
- Dark chocolate ice cream pairs excellently with sea salt, enhancing the flavor balance between sweetness and bitterness for a richer taste experience.
- Adding a pinch of sea salt to homemade dark chocolate ice cream elevates the overall flavor profile and creates a delightful contrast.
- The recipe for dark chocolate ice cream includes ingredients like heavy cream, whole milk, dark chocolate, and sea salt for a luxurious treat.
- Sea salt complements the intense chocolate flavor, making dark chocolate ice cream a sophisticated dessert choice for sharing or enjoying solo.
- Savoring dark chocolate ice cream with sea salt encourages mindfulness, transforming each bite into a pleasurable ritual of indulgence.
History
When you think about dark chocolate ice cream, you mightn’t realize its rich history dates back centuries. The origins trace back to ancient Mesoamerican cultures, where cacao beans were revered. The Mayans and Aztecs enjoyed a bitter beverage made from cacao, often flavored with spices and consumed during rituals.
As chocolate spread across Europe in the 16th century, it transformed into a sweet delicacy. By the 18th century, ice cream began to emerge, marrying the rich flavor of chocolate with creamy textures.
In the 20th century, dark chocolate gained popularity for its health benefits, paving the way for the delicious dark chocolate ice cream you love today. This delightful treat combines tradition with modern indulgence, reflecting its fascinating journey through time.
Recipe
Dark chocolate ice cream is a rich and indulgent treat that elevates the classic dessert to new heights. With its velvety texture and intense chocolate flavor, this ice cream is perfect for satisfying your sweet tooth or impressing guests at a dinner party.
Making dark chocolate ice cream at home allows you to control the ingredients and customize the sweetness to your liking, guaranteeing a delightful experience with every scoop. This homemade version combines high-quality dark chocolate with cream and milk for a luscious base, resulting in a dessert that’s both creamy and decadent.
Making dark chocolate ice cream at home lets you tailor the ingredients and sweetness, ensuring a truly delightful treat in every scoop.
Whether enjoyed on its own or paired with fresh fruit or nuts, dark chocolate ice cream is sure to please chocolate lovers of all ages. Plus, the process is straightforward, making it accessible for both novice and experienced home cooks alike.
Ingredients
- 2 cups heavy cream
- 1 cup whole milk
- 1 cup granulated sugar
- 1 cup dark chocolate (70% cocoa or higher), finely chopped
- 1 teaspoon vanilla extract
- 1/4 teaspoon salt
- 4 large egg yolks
Instructions
In a saucepan over medium heat, combine the heavy cream, whole milk, and sugar; stir until the sugar dissolves and the mixture is warm.
Remove from heat and add the chopped dark chocolate, stirring until it melts completely and the mixture is smooth.
In a separate bowl, whisk the egg yolks, and then gradually temper them by adding a small amount of the warm chocolate mixture to the yolks while whisking continuously.
Pour the yolk mixture back into the saucepan, return to medium heat, and cook while stirring until the mixture thickens and coats the back of a spoon (about 5-7 minutes).
Remove from heat, add the vanilla extract and salt, and cool the mixture before refrigerating for at least 4 hours or overnight.
Once chilled, churn the mixture in an ice cream maker according to the manufacturer’s instructions, then transfer to a container and freeze until firm.
Extra Tips
For an even richer chocolate flavor, consider using a combination of different types of dark chocolate, or adding a splash of espresso powder to enhance the chocolate notes.
If you don’t have an ice cream maker, you can pour the mixture into a shallow dish and freeze it, stirring every 30 minutes to break up any ice crystals until it reaches the desired consistency.
Remember to let the ice cream sit at room temperature for a few minutes before scooping to guarantee it’s easy to serve.
Cooking Steps
To make your dark chocolate ice cream, start by chilling your mixing bowl to guarantee a smooth texture.
Next, melt the dark chocolate gently before whisking it into your cream mixture, adding a touch of sea salt flakes for flavor.
Finally, churn everything together until it’s perfectly smooth and creamy.
Step 1. Chill the Mixing Bowl

Chilling the mixing bowl is an essential step that guarantees your dark chocolate ice cream achieves a smooth and creamy texture. To start, place your mixing bowl in the freezer for about 15 to 30 minutes.
This simple act helps keep the mixture cold, preventing it from melting too quickly when you add your ingredients. While you’re waiting, gather your other ingredients and prepare your workspace.
Once the bowl is chilled, it’ll enhance the mixing process, allowing the flavors to meld beautifully. When you’re ready to mix, pour in your prepared ingredients and begin whisking.
You’ll notice that the cold bowl helps create the ideal consistency for your ice cream, setting the stage for a delicious treat. Enjoy the process!
Step 2. Melt Dark Chocolate Gently

As you prepare to melt the dark chocolate, make certain you use gentle heat to preserve its rich flavor and smooth texture.
Choose a double boiler or a microwave for this task. If using a double boiler, fill the bottom pot with water and bring it to a simmer. Place the chopped chocolate in the top pot, stirring occasionally until it’s fully melted.
If you opt for the microwave, heat the chocolate in short bursts of 15-20 seconds, stirring in between each interval to prevent burning.
Once the chocolate is melted and silky, remove it from the heat source immediately. Let it cool slightly before incorporating it into your ice cream mixture, ensuring it remains luscious and delightful.
Step 3. Whisk in Cream Mixture

After your dark chocolate has cooled slightly, it’s time to whisk in the cream mixture.
Pour the heavy cream into the bowl with the melted chocolate. Grab a whisk and start combining the two ingredients, making sure to incorporate them thoroughly. As you whisk, you’ll notice the mixture becoming smooth and rich.
This step is essential; it helps create that luscious texture you love in ice cream. If you have any vanilla extract, now’s a great time to mix it in for added flavor.
Keep whisking until there are no streaks of chocolate left, and everything looks well-blended. Once you achieve a silky consistency, you’re ready for the next step in your ice cream-making adventure!
Step 4. Add Sea Salt Flakes
Sprinkle a generous pinch of sea salt flakes over your chocolate and cream mixture to elevate the flavors. The salt acts as a flavor enhancer, contrasting perfectly with the richness of the dark chocolate.
Make sure the flakes are evenly distributed throughout the mixture for a balanced taste. You want to create pockets of saltiness that surprise your palate with each bite. Don’t be shy; the salt should complement the sweetness without overpowering it.
As you mix, be sure to incorporate the flakes thoroughly, allowing them to dissolve slightly into the warm chocolate. This step is essential for achieving that delightful sweet-and-salty harmony that makes your ice cream irresistible.
Get ready for a flavor experience like no other!
Step 5. Churn Until Smooth

Churn your mixture in an ice cream maker until it becomes smooth and creamy.
Verify your ice cream maker’s bowl is pre-frozen according to the manufacturer’s instructions.
Start the machine, then pour in your dark chocolate mixture. As it churns, the mixture will thicken and develop a luscious texture.
Keep an eye on it; this process usually takes about 20 to 30 minutes. You’ll know it’s ready when it resembles soft-serve ice cream.
If you prefer a firmer texture, you can transfer it to a container and freeze for a few hours after churning.
Remember to scrape down the sides of the bowl occasionally to guarantee everything’s evenly mixed.
Enjoy the anticipation as your homemade treat takes shape!
Final Thoughts
While indulging in dark chocolate ice cream, you might find yourself reflecting on the delightful balance of rich flavors and creamy textures.
This treat isn’t just a dessert; it’s an experience that tantalizes your taste buds and lifts your spirits. The addition of sea salt enhances the chocolate, creating a perfect harmony that keeps you coming back for more.
Remember, enjoying this ice cream isn’t simply about satisfying a sweet tooth; it’s about savoring each bite.
Whether you’re sharing it with friends or enjoying a quiet moment alone, this dark chocolate ice cream brings joy and comfort.
Frequently Asked Questions
Can I Use Dairy-Free Ingredients for This Ice Cream?
Absolutely, you can use dairy-free ingredients for your ice cream!
In fact, many people are switching to plant-based options for health and ethical reasons. For a creamy texture, try coconut milk or almond milk. You’ll still get that rich flavor you crave.
Just be sure to check for sugar content in your dairy-free alternatives, as some can be sweeter than their dairy counterparts.
Enjoy experimenting with different flavors and textures!
How Long Does Dark Chocolate Ice Cream Last in the Freezer?
Dark chocolate ice cream typically lasts about two to three months in the freezer if stored properly.
Make sure you keep it in an airtight container to prevent freezer burn and maintain its creamy texture.
You might notice a difference in taste or texture after that time, but it’s usually still safe to eat.
Just remember to let it soften a bit before scooping for the best experience!
Enjoy every delicious bite.
Is Dark Chocolate Ice Cream Suitable for Vegans?
You might think all ice cream is off-limits for vegans, but that’s not always the case.
Dark chocolate ice cream can be suitable for vegans if it’s made with plant-based ingredients. Check the label to verify it doesn’t contain dairy or eggs.
Many brands offer vegan-friendly options, using almond, coconut, or oat milk instead.
What Type of Sea Salt Is Best for This Recipe?
When it comes to choosing the best sea salt for your recipe, you’d want to take into account the texture and flavor it brings.
Flaky sea salts like Maldon give a delightful crunch and burst of flavor, while coarse sea salts can provide a more subtle taste.
If you’re aiming for a gourmet touch, try fleur de sel; its delicate crystals enhance any dish beautifully.
Just remember, a little goes a long way!
Can I Add Other Flavors to Dark Chocolate Ice Cream?
Why limit yourself to just one flavor when the world of ice cream offers endless possibilities?
You can definitely add other flavors to dark chocolate ice cream! Think about swirling in raspberry puree for a fruity kick, or infusing it with a hint of espresso for a rich depth.
Even a sprinkle of cinnamon can elevate the experience. So, go ahead and experiment—your taste buds will thank you for the delicious adventure!