Freezing ice cream in portion sizes is a smart way to enjoy your favorite treat without waste. It helps achieve a smoother texture, speeds up freezing, and controls serving sizes. Use airtight containers, preferably flat and wide for easier scooping. Remember to seal properly to prevent freezer burn and maintain quality. Thawing is simple—just pop it in the fridge or let it sit at room temperature for a few minutes. There’s more to discover about keeping your ice cream delicious!
Key Takeaways
- Portioning ice cream speeds up the freezing process, ensuring a smoother texture by minimizing large ice crystals.
- Use airtight, flat, and wide containers to maintain quality and simplify scooping for portioned ice cream.
- Layer plastic wrap directly on the ice cream surface before sealing to prevent air exposure and freezer burn.
- Label containers with flavor and freezing date to track freshness and ensure optimal consumption within one to two weeks.
- Thaw portioned ice cream in the refrigerator for a few hours to maintain texture and make scooping easier before serving.
Benefits of Portioning Ice Cream

When you portion ice cream before freezing, you not only speed up the freezing process but also guarantee a smoother texture by minimizing the formation of large ice crystals.
Portioning ice cream into smaller sizes helps control serving amounts, so you only thaw what you plan to enjoy, reducing food waste. By freezing individual servings, you limit exposure to air and temperature fluctuations, which considerably cuts down the risk of freezer burn and preserves flavor quality.
Plus, smaller containers make scooping and serving so much easier. This method lets you manage your consumption effectively, promoting moderation in indulgence while still enjoying your favorite treat. Additionally, this practice encourages healthy portion control, which can be beneficial for maintaining a balanced diet.
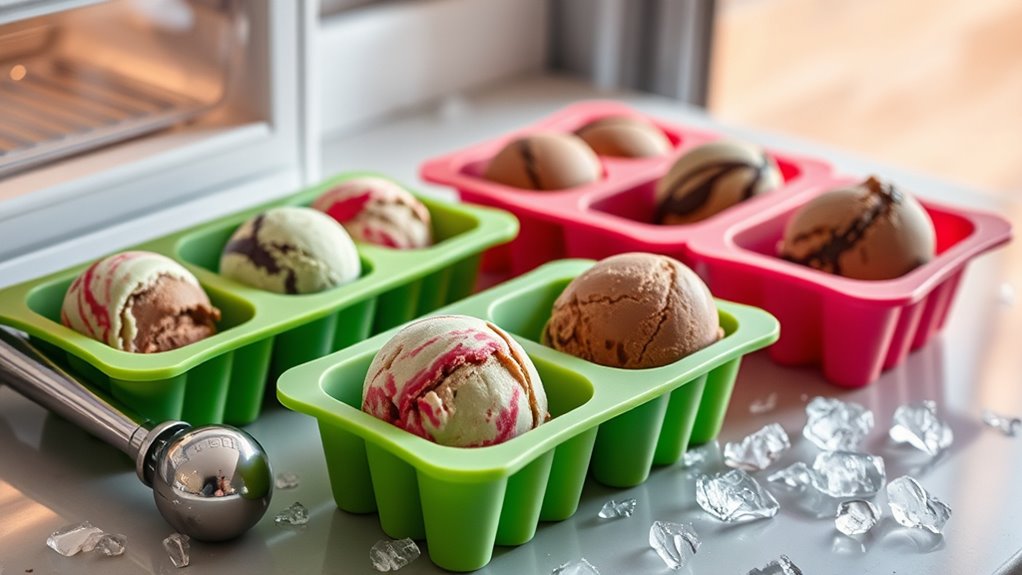
Ideal Containers for Freezing Portions

Choosing the right containers for freezing ice cream portions is essential for maintaining quality and ease of use. Opt for airtight ice cream containers with a high surface-area-to-volume ratio, like flat, wide models, to help your ice cream freeze faster and simplify scooping. Rubbermaid’s five-cup model is a great option due to its durability and shape. While smaller containers are handy for individual servings, they can make scooping tricky if not designed for easy access. Remember, plastic containers outperform ceramics or glass because they conduct heat better. Layering plastic wrap between the ice cream and the lid can also help prevent freezer burn and preserve flavor.
| Container Type | Advantages |
|---|---|
| Rubbermaid 5-Cup | Durable, easy to scoop |
| Flat, Wide Models | Freeze faster, easy access |
| Smaller Containers | Individual servings |
| Plastic Containers | Better heat conductivity |
Tips for Maintaining Ice Cream Quality
Storing ice cream in the right containers is just the beginning of preserving its quality. Use airtight containers to prevent flavor absorption and minimize freezer burn caused by trapped air.
Choose flat, wide containers with a high surface-area-to-volume ratio for faster freezing and easier scooping. Before sealing, layer plastic wrap on top of the ice cream to provide extra protection against freezer burn and texture degradation.
Keep your ice cream at a consistent temperature below 0°F; the back of the freezer is ideal, as it’s less affected by temperature fluctuations from door openings.
Finally, enjoy your homemade ice cream within one to two weeks to guarantee peak flavor and texture—longer storage can lead to graininess and loss of quality.
Proper Sealing Techniques

Proper sealing techniques are essential for preserving the quality of your homemade ice cream. To prevent freezer burn, always use airtight containers designed for freezing, like durable plastic or silicone.
Before sealing, consider layering plastic wrap directly on the surface of the ice cream; this extra barrier helps keep air and moisture at bay. Make certain to leave about ½ inch of space between the ice cream and the container lid to allow for expansion as it freezes.
Don’t forget to label each container with the flavor and date of freezing, so you can track freshness and enjoy your treats at their best. Following these steps guarantees your ice cream stays delicious and creamy!
Best Practices for Thawing and Serving

After sealing your homemade ice cream with care, the next step is ensuring it’s thawed and served correctly for the best experience.
For best thawing ice cream, place it in the refrigerator for a few hours to maintain a consistent temperature and prevent large ice crystals from forming.
Before serving, let it sit at room temperature for about 5-10 minutes; this softens it just enough for easy scooping without melting completely.
If it melts too much, you can re-churn it in an ice cream maker for a creamier texture.
Portioning ice cream into smaller, flat containers speeds up thawing, enhancing your serving experience.
Always reseal and return leftovers to the freezer promptly to maintain ideal texture and prevent freezer burn.
Frequently Asked Questions
How to Freeze Individual Servings of Ice Cream?
To freeze individual servings of ice cream effectively, scoop the ice cream into flat, wide containers. This shape helps it freeze faster and makes scooping easier later.
Use airtight containers or plastic freezer bags, squeezing out excess air to avoid freezer burn. Wrap each portion tightly, label them with the date and flavor, and store them at the back of the freezer for consistent temperatures.
Aim to enjoy them within one to two weeks for the best flavor.
How Much Ice Cream Is a Serving Size?
A typical serving size of ice cream is about ½ cup, which usually contains 100 to 300 calories, depending on the flavor.
It’s easy to exceed the recommended daily sugar intake with just a couple of servings, so keeping an eye on portion sizes is important.
If you’re mindful of your intake, measuring out that ½ cup can help you enjoy your treat without overindulging.
Always consider the brand’s serving size, as it can vary.
How to Pre-Portion Ice Cream?
Imagine a treasure chest filled with delightful gems—each scoop of ice cream is a sparkling jewel waiting to be enjoyed.
To pre-portion your ice cream, use flat, wide containers for quick freezing. Scoop out uniform portions with a measuring cup, then wrap them tightly in plastic or place them in airtight containers.
Label each with the date and flavor, storing them in the back of your freezer for ideal freshness. Enjoy your frozen treasures!
Why Is My Ice Cream Hard After Freezing?
If your ice cream’s hard after freezing, it could be due to large ice crystals forming from temperature fluctuations or improper storage.
When you leave it out too long before returning it to the freezer, that warmth causes those crystals to grow.
To keep your ice cream creamy, store it in airtight containers at a consistent temperature below 0°F.
This minimizes air exposure and helps maintain that smooth texture you love.
Conclusion
By freezing ice cream in portion sizes, you’re not just saving time; you’re creating a sweet oasis of convenience that’s ready whenever you crave a scoop. With the right containers and sealing techniques, you’ll keep that creamy goodness tasting like it just came out of the ice cream truck. So, grab your favorite flavor, freeze it in perfect portions, and enjoy a scoop of happiness that’s always just a thaw away!